THE CHAPEAU-à-BECA 200-YEAR MILLINERY SUCCESS STORY
PRESENTED BY
MUNGO NAPIERLAIRD OF MALLARD LODGE,SOCIETY FOR CREATIVE ANACHRONISM
CLICK ON ANY IMAGE TO ENLARGE
THESE ARE LARGE FILES AND TAKE TIME TO LOAD!
This blog entry is a never-presented ZOOM class for an online session of the University of Atlantia. It is based on a live presentation I tested at the Shire of Isenfir's Arts & Science Night in February 2022.

Welcome good friends. I am your host, Mungo Napier, Laird of Mallard Lodge. This class is all about the chapeau-à-bec, one of the most familiar hats from the Middle Ages. I will introduce you to the hat with a few historical examples, then will demonstrate two simple methods to make this hat for yourself.

The English call this hat a "bycocket", which is a rather smutty term. As the SCA is a family-friendly outfit, I suggest we use the French name "chapeau-à-bec", which means "hat with a beak".


The earliest English examples your host has found are from the LUTTRELL PSALTER, which some scholars date to around 1325 or slightly later. There are five examples of the chapeau-à-bec in the psalter, suggesting that the hat was common in England by that time.

Many Italian examples dating to as early as 1338 are among frescoes found in the Camposanto, a cemetery and mausoleum associated with the Cathedral of Pisa and its famous Leaning Tower. In Italy this hat was called a falucca after the small boat with a triangular sail.

Another Italian example is this stunning 1380 fresco showing Saint Helena from the Bascilica of Santa Croce in Florence.

German examples are found in illuminated manuscripts of the 14th and 15th centuries, and on a deck of playing cards which dates from 1455. The figure on this card depicts a "bott" or messenger.


The latest examples your host has found are from German and Flemish illuminations dating to around 1500.

Chapeau-à-bec hats worn by peasants were likely made from low-grade wool and would rarely have been lined. The most common decoration would have been a feather, but two examples from the LUTTRELL PSALTER are decorated with pilgrim signs, (or pilgrim badges was we erroneously call them today). The unhappy plowman in this image wears his hat backwards, perhaps to not block his vision as he guides the plow.

Middle class hats would probably have been from better grades of wool, and were likely to be lined with linen. The lining gave them a brim with a contrasting color. Note that this example has a chin strap or cord to keep the hat from being lost.

Hats for nobles were often made from the best wool and linen, or might be from more costly fabrics like velvet lined with silk. Nobles' hats are often shown with elaborate bling such as piping, embroidery and especially ermine trim.

When the chapeau-à-bec became fashionable among the wealthy, the beak often grew much longer, sometimes as long as the rest of the hat. The crown was sometimes very tall, similar to a sugar loaf hat but with the brim and beak.

During the 16th century, the hat shrank to a lower crown, sometimes flat on top, and a shorter rounded bill, similar to a "Tyrolean" hat. Without the long beak, it could no longer be called a "chapeau-à-bec". Such hats are shown in Peiter Bruegel the Elder's mid-century genre paintings such as "The Peasant Wedding" or "Hunters in the Snow".

Even today, fancy low-crowned chapeau-à-bec hats are worn for British ceremonies, such as the opening of Parliament in the House of Lords. This version is called a "cap of maintenance", and is worn by certain nobles or specially appointed officers. It is almost always worn with its point to the rear.

In all SCA kingdoms, a "cap of maintenance gules trimmed ermine", or a "cap of maintenance gules trimmed argent goutty de sang", are reserved regalia worn only by the Order of the Pelican. In some kingdoms caps of other colors with ermine trim may also be reserved regalia. Before making such a hat, check with a senior herald to avoid embarrassment. In the SCA these hats can vary in shape. Our example (above) is a standardized heralidc charge.

Now let's turn our attention to making a chapeau-à-bec. Actual medieval methods for making the hat are not known for certain, but either of my methods will make an acceptable hat for general SCA use.
The first method is to sew the hat from two pieces of coat-weight wool. Suit-weight wool is not thick enough to make a good hat unless lined. As there are several possible variations, I suggest making some test hats from cheap craft felt to see which options you like best before chopping up an expensive piece of wool.

A template is archived among the Shire of Isenfir's A&S pages at isenfir.atlantia.sca.org . The template comes in two pieces you must tape or glue together, as it is too wide for most printers. I suggest using the paper template to make a more durable template from light cardboard. My template will fit most adult head sizes. If you make a hat for a child, resize the template using your printer software.

Two diagonal lines marked "brim fold lines" are for your choice of a 3 or 4-inch high brim back (or between if you wish). Which height you choose will determine how the hat sits in relation to your ears. It does not change the over-all hat height which is determined by where the crown sits atop your bean. I prefer a 3-inch brim. Anything below 3 inches, or above 4 inches does not look right.

If you cut your fabric to the descending vertical line, the finished hat will have "ditch" between the back of the brim and the crown. This is actually seen in some period illustrations, but to me unattractive. Cutting to one or the other optional lines will make the brim sit closer to the crown for a more finished look.

Mark your crown pieces on the back side of your wool. The back is the side that shows the most weave, while the front is the fuzzy side (on some wool there is little difference). Make all your cuts inside your marks, especially along the brim, as the back side will actually show on the finished hat's brim. Be sure to make the two pieces mirror images, or you will end up with a fuzzy side on half your hat, and a weave side on the other. Tsk, tsk.

Pin the two halves together fuzzy-side to fuzzy-side. Trim off any overhang until the two pieces have the same edges. Begin sewing from the point, moving around the crown until you reach the brim fold line. Turn the hat outside-in, and finish your stitching. This will hide your brim stitches between the brim and the crown. I prefer hand stitching (sewing machines and I don't get along very well), but machine sewing is o.k. as most your stitches will be hidden.

Finish by ironing all the seams flat. Flip up the brim and iron the brim fold to a tight crease. Add a feather to the crown just behind the brim, or other decoration, and your hat is finished. Note: My hats are not as curved as they appear in these illustrations; my wig head is rather small and adds to the curve.

Lined hats are actually fairly simple. If you line with wool, cut two additional pieces to the same size as the crown pieces, as described earlier. With most wool there is no need to hem the edge. Stack your pieces from bottom to top, first a lining with fuzzy side down, crown fuzzy side up, crown fuzzy side down, lining fuzzy side up. This will put the more attractive fuzzy wool facing out on both the crown and brim.

Linen and other fabrics will need to have their bottom edge hemmed. Make the lining pieces slightly oversized, hem the bottom, then pin the lining to the crown pieces and trim. The order for sewing the pieces is lining with the hem facing up first, then crown with fuzzy side up, crown with fuzzy side down, lining with hem facing down. Make sure your hem and crown pieces are aligned exactly along the bottom edge. Sew around the crown as described earlier for the unlined hat. Finally, sew the two lining pieces to their respective crown pieces along the open brim edges.

Iron all the seams flat. Flip up the brim to the desired height and iron the brim fold crease. Add a feather or other decoration and it is ready to wear.

Method 2 uses commercial felt hat blanks called "cones". I bought several from Jedrzejko via Etsy (https://www.etsy.com/shop/Jedrzejko). Similar cones are also available from Lawliet on Amazon (https://www.amazon.com/Lawliet-Cloche-millinery-Fascinators-Block/dp/B01N0IH64U?th=1). Both seem to be of excellent quality, but Jedrzejko offers more colors. Lawliet's gray is a heavier 120g weight, and their pink is just 80g (but pink is not very medieval!). I suggest you avoid these two colors. The rest of Lawliet's cones, and all of Jedrzejko's are 100g wool.
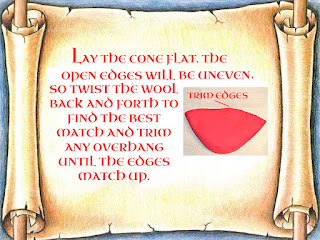
My cones were not quite even around the bottom. Flatten the edges together, and rotate them until you get the best match. Trim away any uneven spots.

Iron a crease about 5 or 6 inches long where you decide the hat's centerline and beak will be. Iron the rear end for 3 or 4 inches, depending on your brim height preference. Fold the brim up at the back up and iron the brim fold line at the rear only.
.

Clip away a narrow "V" down from the brim at the rear. Fold the brim down and sew the two pieces back together. Then flip the brim back up.

Finally, iron the brim fold down to the point on each side. There may be a very wide V-shaped dip right above the rear seam. If this bothers you, trim the brim edge straight from the rear seam forward on each side (under the feather in the above example). Due to the fabric being bent against its natural curl, you may see some wobbles along the brim line. These should disappear when the hat is on your head.

Please send any questions or comments to my email at the above address.